Example: Label style for working drawing (with two foils)
 Tool(s) Label Style
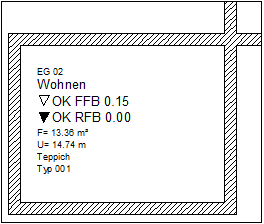
The custom label will include the following elements at 1:50:
Name
Function
TL of finished floor (= +0.15)
TL of unfinished floor
Floor area
Perimeter
Covering (Text 1)
Type of covering (Text 2)
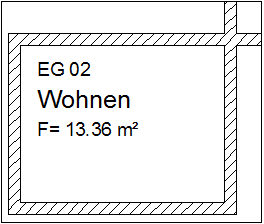
The following is required for scale 1:100:
Name
Function
Floor area
The basic approach is the same as in Label style with floor area and Label style for balcony.
The TL FF (top level, finished floor) is obtained using a formula; draw the symbols for this in the Draft module using  Line and
  Fill. You should already be familiar with the concept of foils from the Smart Symbols module.
When you label a room with this label style, you will obtain the following results…
…at a scale of 1:50:
...and at a scale of 1:100:
To create a label style with two foils
- Click
 Label Style (How).
 - To place the attributes for the first foil (up to 1:50) in the workspace, start by setting the
 Reference Scale to 1:50.
 - Now place the following attributes with the appropriate settings in the workspace:
- To place the attributes for the second foil of the label style in the drawing file, set the Reference Scale to 1:100. Don’t worry about the “incorrect” text offsets; when you save the label style, the appropriate scale will be set again.
- Now place the following attributes with the appropriate settings in the workspace:
- Name from General architecture, text height 2.5mm, text anchor point is bottom left
- Function from General architecture, text height 3.5mm, text anchor point is bottom left
- Floor area from Archit. quantities, text height 2.5 mm, text anchor point bottom left, for Prefix: A=
- If you want, you can now enhance the appearance by switching to other modules, aligning the various elements and drawing a border, for example.
The result might look like this: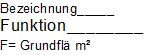
- To save the label style, set the reference scale back to 1:50.
- Click Label Style (How). Click DefFol.
- Set Foil to On, specify that the foil is to change with the reference scale by clicking the box beside Dependent on until RSC is displayed and set the validity range for the first foil:
RSC->: 1
<=RSC: 51Note: The reference scale at which the label style is usually displayed should always be within the validity range defined by the upper and lower limits.
- Select the elements for the first foil and define the drop-in point.
- Now set the reference scale to 1:100.
- Click Foil and set the validity range for the second foil:
RSC->: 52
<=RSC: 9999 - Now select the elements for the second foil and define the drop-in point.
- Press ESC to finish.
- Specify whether the individual foils of the label style can be selected and moved independently of each other.
- Save the smart symbol.
More examples:
Label style with floor area
Label style for balcony (with half the base area)
Label style with one foil for all scale ranges

