Example: Label style with floor area
 Tool(s) Label Style
In this example we will create a label style at a scale of 1:100 that will include not only the name and function, but also the floor area.
The label style might look like this:
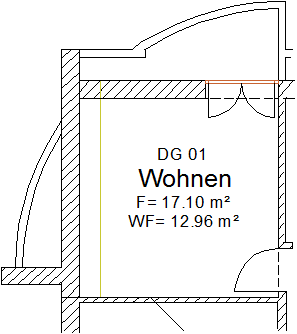
To create a label style that includes the floor area
- Set the
 Reference Scale (How) to 1:100.
 - Open the Draft module and draw a template in construction line mode. This will help us to align the custom label later.
Example:
(A) Template in construction line mode
- Switch construction line mode off and select
 Label Style (How).
 - Now define attributes as placeholders. These will be filled with the various values when used to label the room later.
To enter the placeholder for the name, click Attribute on the Context toolbar. In the Attribute Selection dialog box, click General Architecture and select Name.
Define the text settings to be used for the label in the following dialog box (in this example the TrueType font Arial is used). Set a suitable Text height and width and define the Text's anchor point (at bottom left or centered).
Position the text in the template. To make this easier, click in the workspace with the right mouse button, select  Point snap options on the shortcut menu and select the Point of intersection option in the Point snap area.
 - Use the same approach to select the placeholder for Function (also in General Architecture) and place it in the document (in this example, the height is set to 3.5 mm).
- To select the placeholder for the floor area, click Attribute, then Archit. quantities, and select Floor area (here, too, set the text height to 2.5 mm).
Set the text parameters in the next dialog box. Click Prefix and enter A=. Place the attribute in the template. - Using the same approach, select the placeholder for Floor_area _finished_dimensions (also in Archit. quantities), define the text parameters, enter FA= under Prefix and place the attribute in the template.
The result might look like this: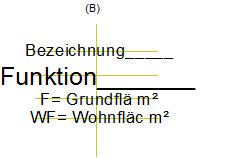
(B) The attributes are aligned with the template
- To save the label style, click Label Style (How) again. On the context toolbar, click DefFol and select the elements to be included in the label.
Define a reference point for the label (centered is best) and save.
To use a label style to label a room
- Click
 Room (How).
 - Define the room and enter its name and function. Click the right mouse button to confirm.
- On the context toolbar, click
 Label Style and select the one you just defined. It is in the Office folder.
 - A preview of the label style is attached to the crosshairs. Place it in the drawing file.
You can use the to help you place it.
More examples:
Label style for balcony (with half the base area)
Label style for working drawing (with two foils for different scales)
Label style with one foil for all scale ranges
