Example: Label style for balcony (with half the base area)
 Tool(s) Label Style
The approach is the same as in the example Label style with floor area.
The custom label is to include the following elements: name, area, and half area. The last element (half area) will be generated by using a formula.
The label might look like this:
To create a custom label including a formula
- Follow the instructions in steps 1-3 of the example Label style with floor area.
- Select the attributes Name in General architecture and Floor area in Archit. quantities and place them in the workspace (see steps 4 and 6 of the "Label style with floor area" example).
- To define the placeholder for Area/2, click Formula on the Context toolbar. In the References area of the Define Formula dialog box, click Attribute.
Select Archit. quantities and then Floor area.
In the Operators area, click / (division symbol) and in the Number area, click 2 (i.e., divide by two).
Check that the formula has been entered correctly in the Formula box at the bottom.
Click OK to confirm the dialog box.
On the Context toolbar, click Prefix and enter 1/2A =; if you also wish the unit to be displayed in the label, click Dim and select m2 in the Unit dialog box. Confirm your settings and position the formula in the workspace.
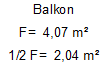
The result might look like this: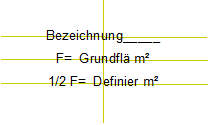
- If you want, you can now enhance the appearance by switching to other modules, aligning the various elements and drawing a border, for example.
- To save the label style, click
 Label Style (How) again. On the context toolbar, click DefFol and select the elements to be included in the label.
Define a reference point for the label (centered is best) and save.
More examples:
Label style with floor area
Label style for working drawing (with two foils for different scales)
Label style with one foil for all scale ranges
