Contents

Index

Free-form stair

Module(s): Stairs

You can use the Free-Form Stair tool to draw free-form stairs.

To create a free-form stair

  1. Click Free-Form (How).
  2. Place the start of the stair's outline polygon.
  3. Set the other points for the outline polygon either by entering X and Y vectors
    or
    using the automation tool or the polyline entry tools
    or
    by using the drawing aids in the dialog line and on the shortcut menu.

    Note: You can enter up to 200 points.

  4. To finish defining the outline, click the first point again or press ESC.
  5. Now place points for the line of travel using the polyline entry tools. Start at the bottom of the stair. Press ESC to finish.

    Tip: If the Polygonize elements check box is selected in the Input Options, you can also use existing elements for the line of travel (circles, ellipses, for example). To do this, click the element you want to use. If this option is not selected, existing elements are ignored.

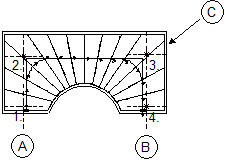
    Points for line of travel: points 1 (bottom) through 4 (top)
    Starting angle: + 180°
    Angle of rotation (delta angle): - 180°
    (A) Bottom
    (B) Top
    (C) Outline

  6. The following parameters are displayed:
    Starting angle
    defines the orientation of the first step based on the unit circle.
    Angle of rotation
    defines the delta angle between the front edge of the bottom step and the rear edge of the top step. Entering a positive value will generate a line of travel that runs counter-clockwise (see unit circle).
    Arc
    defines the fillet radius for the line of travel; entering 0 disables this option.
  7. Click Height to set up the height of the stair.
  8. Click Match to copy the component settings from an existing stair.
  9. Right-click in the workspace or click OK on the context toolbar to confirm the current settings.
  10. Define the geometry of the stair (rise, tread, etc..).
  11. Click and define the individual stair components.
    Click OK to confirm the settings.
  12. Click Close to finish designing the stair and acknowledge the prompt by clicking Yes.

    The stair is saved and this completes the design.

  13. Place the stair’s label .

Example 1

Example 2


(C) Allplan GmbH Privacy policy