![]()
![]()
|
|
|
![]() Module(s): Basic: Walls, Openings, Components
Module(s): Basic: Walls, Openings, Components
You can use the ![]() Polygonal Niche, Recess, Slit, Opening tool to insert niches, recesses, slits and openings with a polygonal boundary in walls.
Polygonal Niche, Recess, Slit, Opening tool to insert niches, recesses, slits and openings with a polygonal boundary in walls.
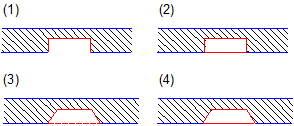
Differences between niche - recess - polygonal recess
To create a niche, recess, slit or opening with a polygonal boundary
Note: As opposed to niches, recesses in vertical surfaces are ignored in quantity takeoff operations.
Note: For quantity takeoff operations that are compliant with German building regulations, you need to make sure that the openings are within the components.
Tip: Openings applied to vertical surfaces in rooms are not taken into account as these openings will usually be closed later. Consequently, they are not displayed in the animation. Niches, on the other hand, remain open. Consequently, they are taken into account when you apply vertical surfaces and they are also displayed in the animation. To display an opening in the animation, you can enter a wall niche without a rear surface.
| (C) Allplan GmbH | Privacy policy |